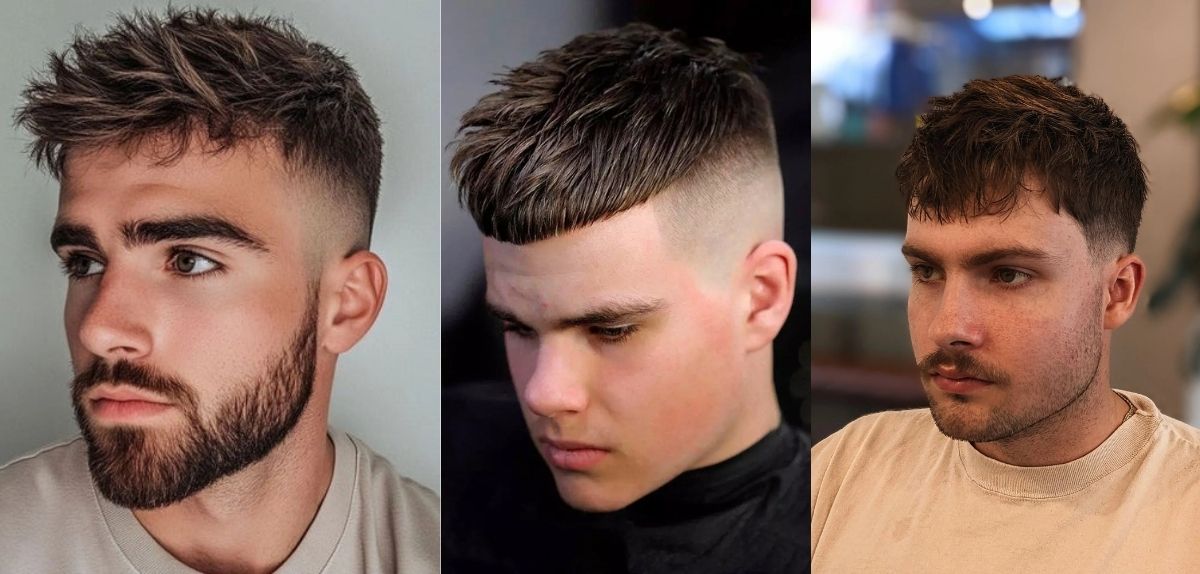
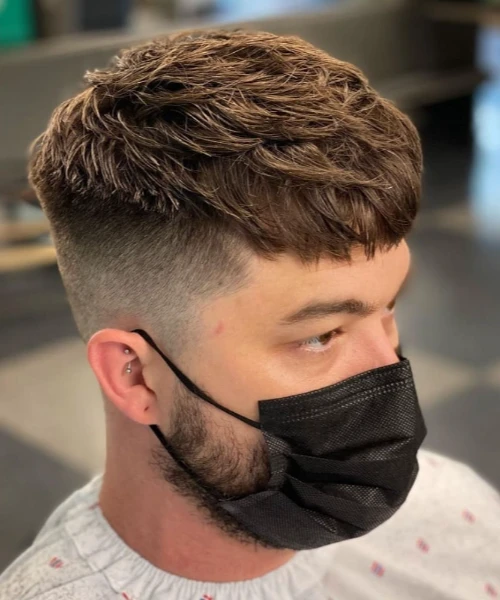
If you’ve been scrolling through TikTok lately or catching glimpses of stars like Henry Cavill, chances are you’ve noticed the textured crop fade making waves again. This look has become one of 2025’s hottest men’s haircut trends — sharp, modern, and surprisingly easy to maintain. Whether you’re after that clean, confident style for work or something effortlessly cool for weekends, the textured crop fade delivers both in one cut.
At its core, this hairstyle blends precision with personality. It combines short faded sides and a longer, choppy top that gives your hair natural movement and volume. What makes it so appealing is how versatile it is — it looks as good styled sleek with a bit of matte pomade as it does tousled for that “I woke up like this” vibe.
In this guide, we’ll break down everything you need to know — from understanding the cut to nailing the fade and adding the right texture — so you can achieve barbershop results at home or know exactly what to ask your barber for.
What Makes the Textured Crop Fade So Popular
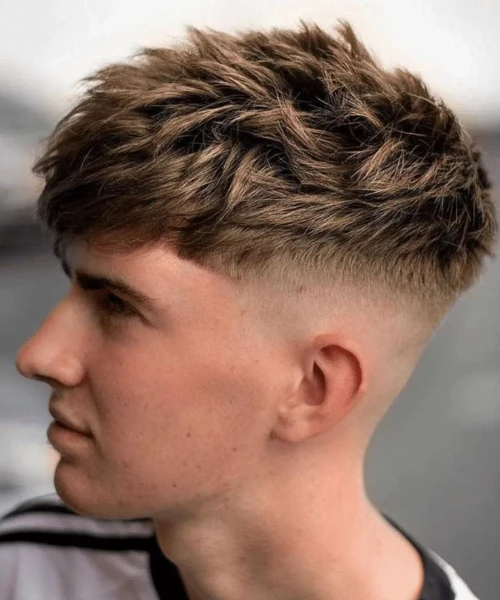
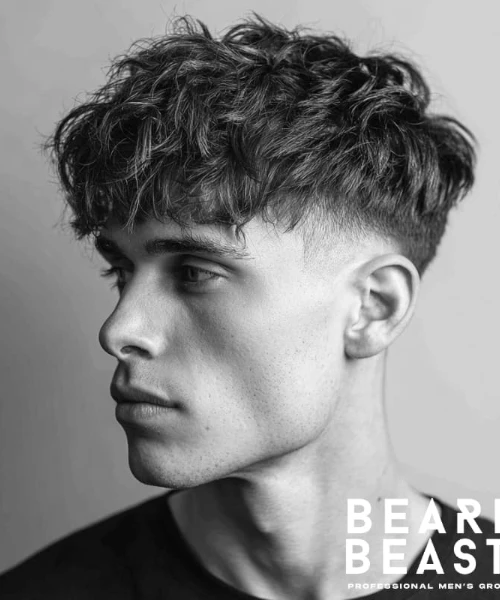
The textured crop fade isn’t just another short haircut — it’s a modern take on a classic style that’s evolved through social media and pop culture. You’ll recognize its signature mix of short faded sides, a defined crop fringe, and messy texture on top that adds depth and volume.
Key Features
- Fade levels: High, mid, or low fades depending on how dramatic you want the contrast.
- Textured top: Created with choppy, uneven layers for movement.
- Defined fringe: Usually straight or slightly angled to frame the face.
Who It Suits Best
This style flatters most straight or wavy hair types and works especially well with oval or square face shapes. It’s perfect for anyone who wants a low-maintenance yet fashion-forward look — from professionals keeping it clean to trendsetters who like a bold edge.
Why It’s Trending in 2025
The rise of #TexturedCropFade on TikTok and Instagram has made it a go-to cut for men chasing that effortless, editorial look. Barbers around the world are remixing it with fades, designs, and fringe variations — making it both timeless and customizable.
How to Prep Before Getting a Textured Crop Fade
Before you pick up the clippers or head to the barbershop, a little prep work can make all the difference. Getting the perfect textured crop fade isn’t just about skill — it’s about setting the stage for clean lines, balanced texture, and long-lasting shape.
1. Assess Your Hair Type
Start by figuring out your hair’s natural texture and growth pattern.
- Straight hair: Easy to blend and perfect for sharp, defined fades.
- Wavy hair: Ideal for creating that natural, effortless texture on top.
- Curly or coarse hair: Needs careful shaping and moisturizing products to avoid puffiness.
Aim for 1–2 inches of length on top so there’s enough to texturize and style. The sides should be shorter — your barber will adjust fade height based on your head shape and style preference.
2. Gather the Right Tools
If you’re trying this cut at home or just want to understand what your barber will use, here’s your checklist:
- Clippers with guards #1–#4 for controlled fading
- Precision trimmer for edges and hairline clean-up
- Scissors and texturizing shears for shaping the top
- A fine-tooth comb for blending
- Blow-dryer (optional but helpful for styling and volume)
- Mirror setup (front and handheld) to check all angles
Having the right tools — or knowing what your barber should use — helps ensure even blending and a sharp finish.
3. Wash and Prep Your Hair
Always start with clean, product-free hair. Use a gentle shampoo to remove any buildup, then towel-dry until slightly damp. If you’re getting it done professionally, show up with freshly washed hair unless your barber suggests otherwise — it helps them see your natural growth pattern and texture better.
If it’s your first time, bring a few reference photos (for example, a Henry Cavill-style crop or a mid fade with blunt fringe) so your barber knows the look you’re aiming for.
Step-by-Step Guide to Cutting the Textured Crop Fade
Now that your hair is prepped, it’s time to create the clean fade and choppy top that make this cut stand out. Whether you’re visiting a barber or doing it yourself at home, these simple steps will help you achieve a professional, textured finish.
Step 1: Create the Fade
Start by deciding your fade level — high, mid, or low:
- High fade: Starts near the temples for a bold, edgy look.
- Mid fade: Sits around the middle of the head for a balanced style.
- Low fade: Begins just above the ears for a subtle, classic vibe.
Use clippers with guard #0 or #1 at the base, then gradually move up with #2, #3, or #4 to build a smooth gradient. Work slowly in upward motions and keep checking both sides in a mirror to stay even. Clean up around the ears and neckline using a trimmer for sharp detail.
Step 2: Trim and Texturize the Top
Once the sides are faded, move on to the top. Leave about 1–2 inches of length, depending on your preference.
- Use scissors to trim in short, choppy motions — this adds movement.
- For extra texture, use texturizing shears to thin out heavy areas and break up uniform sections.
- If you want a defined fringe, trim the front bluntly across or at a slight angle for that classic crop finish.
Pro tip: Always cut less than you think at first. You can go shorter later, but you can’t undo overcutting.
Step 3: Blend the Top and Sides
To merge the top with the fade, use the clipper-over-comb technique or scissors to blend the connection area. Keep the blending line soft and natural. Run your fingers through the top to check texture — it should feel slightly uneven, not flat or blocky.
Finish by tapering the sideburns and neckline for clean edges. This final polish makes the whole cut look crisp and intentional.
How to Style the Textured Crop Fade
Once the cut is done, styling is where the magic really happens. The beauty of the textured crop fade is that it doesn’t need much effort — just the right products and a few quick techniques to bring out the shape and texture.
Step 1: Choose the Right Product
Pick a matte-finish product that adds definition without shine.
Here are a few great options:
- Matte clay or pomade: Gives control and a natural hold (try Hanz de Fuko Claymation).
- Styling wax: Ideal for thicker hair that needs strong structure.
- Texturizing powder: Adds instant lift for fine or limp hair.
Avoid greasy or glossy gels — they can flatten the texture and ruin the fade’s natural contrast.
Step 2: Blow-Dry for Shape
Start with damp hair and use a blow-dryer to build volume. Dry the hair forward and upward using your fingers or a small round brush. This helps define the fringe while keeping that messy yet intentional vibe.
If your hair tends to fall flat, tilt your head forward as you blow-dry from the back to the front — it’ll give your top more structure.
Step 3: Apply and Style
Scoop a pea-sized amount of your chosen product, rub it between your palms, and work it evenly through your hair from back to front.
- For a messy finish, use your fingers to tousle the top and separate pieces.
- For a clean, forward crop, smooth the front down with your palms and define the fringe with a comb.
You can switch things up based on the occasion — keep it neat for workdays or go relaxed and tousled for weekends.
Step 4: Keep It Natural
The textured crop fade looks best when it moves naturally. Don’t overload with product or overstyle. A little product goes a long way to keep that lightweight, effortless texture.
Maintenance and Upkeep for the Textured Crop Fade
A great textured crop fade only stays great if you keep it sharp. The good news? It’s one of the easiest hairstyles to maintain — just a few small habits will keep your fade crisp and your texture fresh week after week.
1. Schedule Regular Trims
Because the fade grows out fast, aim to visit your barber every 2–3 weeks. Regular trims keep the sides clean and the top balanced, preventing that bulky, uneven look.
If you’re maintaining it yourself, use your clippers with guard #2 or #3 to lightly freshen the sides and neckline. Always blend slowly to avoid harsh lines.
2. Follow a Simple Wash Routine
Use a sulfate-free shampoo to protect your scalp and natural oils — harsh shampoos can make short hair dry and dull. Follow up with a light conditioner once or twice a week to keep the top soft and easy to style.
If you use styling products daily, rinse your hair before bed or do a quick water rinse in the morning to avoid buildup.
3. Protect from Heat and Product Damage
If you use a blow-dryer, apply a heat protectant spray first. Over time, high heat can weaken hair and dull texture. And when applying wax or clay, go easy — too much product can weigh hair down or clog follicles.
4. Refresh Between Cuts
Between barber visits, you can use dry shampoo or sea salt spray to revive the texture and lift. For quick touch-ups, tidy your fade edges and neckline with a trimmer every few days.
Troubleshooting Common Textured Crop Fade Problems
Even with the best technique, small issues can pop up after your haircut or during styling. Don’t worry — they’re easy to fix once you know what’s causing them.
1. Uneven or Patchy Fade
If your fade looks blotchy or one side sits higher than the other, it’s usually because of inconsistent clipper pressure or jumping between guard sizes too quickly.
Fix it:
- Blend gradually between each guard level (#1 → #2 → #3).
- Always start lower and build upward in slow, circular motions.
- For touch-ups, use a clipper-over-comb technique to smooth harsh lines.
If you’re not confident fixing it yourself, visit your barber — they can re-blend the fade in under 10 minutes.
2. Flat or Lifeless Top
If the top of your crop looks flat, your hair may need more volume or lighter product.
Fix it:
- Use a blow-dryer on damp hair and lift the roots with your fingers.
- Swap heavy wax or gel for a texturizing powder or matte clay.
- For fine hair, apply product mainly at the roots instead of the tips.
A little lift goes a long way — it instantly revives that choppy, stylish texture.
3. Patchy or Rough Texture
If the top looks uneven or stiff, it’s often from over-texturizing or cutting the top too short.
Fix it:
- Ask your barber to add a few soft layers to balance things out.
- Use a sea salt spray or light pomade to define sections without stiffness.
- Avoid cutting wet hair too aggressively next time — textured crops look best when shaped dry.
4. Fade Line Looks Too Harsh
A heavy line between the top and sides can make the fade look unnatural.
Fix it:
- Use blending scissors or your clipper with a higher guard (#4 or #5) to soften it.
- Comb upward while trimming small sections at a time.
If you’re unsure, leave blending to your barber — fades are all about subtlety, and one wrong move can throw off the balance.
Conclusion
The textured crop fade isn’t just another men’s haircut — it’s the ultimate mix of sharp and effortless. With short faded sides, a choppy top, and easy styling, it’s perfect for guys who want something modern yet low-maintenance. Whether you go to a barber or try it at home, the key lies in clean blending, the right tools, and a light touch when styling.
Once you’ve mastered the fade and texture, maintaining it becomes second nature. A quick trim every few weeks, a quality matte product, and a good shampoo routine are all you need to keep it looking fresh.
If you’re ready to level up your look, try the textured crop fade and make it your signature style. Experiment with variations — like a curly crop fade or a skin fade — and share your version with #TexturedCropFade. The best part? This is one haircut that always looks good, even when you don’t try too hard.